Home - Make Sea Glass Jewelry
Make Sea Glass Jewelry
How you can make sea glass or beach glass jewelry.
Information on the most used techniques...
The Information Here Covers the Following Topics:
 Lin Schneider - Jeweler OdysseySeaGlass.com
Sea Glass is beautiful
unadorned but using it in jewelry is an even better way of showing it off.
1. Drilling Sea Glass Jewelry
Drilling sea glass is probably the most basic way to make sea glass jewelry that can be attached (hung) using a solid piece of sea glass.
Once it's drilled, you can simply string it on a cord or necklace using an attractive wire bail to attach it to the necklace or earring or even a simple jump ring.
Here is a simple and effective video on drilling sea glass using a Dremel drill and a drill press.
Some find it easier or better to drill without a drill press. Here is how to drill with just a Dremel.
Compare this method to wrapping or setting your sea glass:
Pros:
- Variety - Once the glass is drilled, it's a fast and easy way to make nice sea glass jewelry and other projects.
- Shows the sea glass to advantage by not blocking the light that shines through the glass.
Cons:
- Sea glass will crack sometimes with drilling.
- Drilling ruins the intrinsic value of a good piece of sea glass!
- For these two reasons, drilling is recommended ONLY for your less
valuable pieces, at least until you are very experienced
Follow the video instructions carefully.
SEA GLASS TOOLS
For drilling and working with sea glass.
Drill bits:
We recommend diamond burr drill bits. Why? The price is very reasonable. Don't be discouraged if some of the bits don't drill well - for the inexpensive price, you are going to get a few duds but will be way ahead of buying a few expensive bits.
Bits will break with too much pressure. Again, watch the videos, read the comments, and follow closely.
The following set of bits includes the 3 most popular sizes for drilling sea glass:

2. Wire Wrapped Sea Glass Jewelry
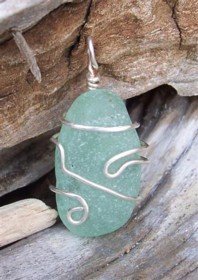
Wire wrapping is probably the most commonly-used way to mount sea glass jewelry.
Depending on your taste, it can be very spare or as ornate as one would like.
The result is a very attractive setting that emphasizes rather than detracts from the sea glass.
This video shows steps to make your own wire-wrapped sea glass jewelry.
The standard wire for wrapping elegant sea glass jewelry is 20 gauge sterling silver. Copper wire and gold fill are also excellent choices.
A 18 gauge wire will be much sturdier, while 22 gauge or smaller is used by itself or in conjunction with heavier wire for a more delicate look.
Compare this method to drilling or setting your sea glass:
Pros:
- Only a relatively small number of tools are needed to begin. Technical skills are not required to the extent needed in some of the other methods.
- Easy to do using angular and very irregularly-shaped pieces of sea glass
- Preserves the value of the sea glass. It can be taken apart and stored in a collection, if desired. This is important, as, with time, the sea glass may end up being worth much more than its setting.
Cons:
- May be weak or frail. A valued piece of sea glass could fall out and become LOST very easily
if the wrapping is not designed and worked correctly.
3. Bezeled Sea Glass Jewelry
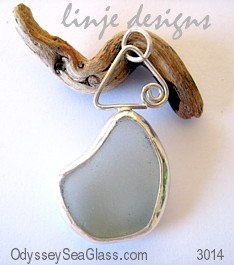
Bezeling is used in making settings for stones, ceramic, or glass in rings or pendants.
The piece is circled and hugged by a flattened wire rim (usually silver) which itself may be soldered to a backing of a thin sheet of the same metal.
Bezeling requires more training than either drilling or wrapping sea glass but the end result is a very classy look.
The following video is the first in a 5-part series on how to bezel.
Compare this method to drilling or wire-wrapping your sea glass:
Pros:
-
Once you master soldering and bezeling, it opens the door to a huge field of design possibilities.
- Does not physically damage the glass as drilling does.
- Very attractive and elegant.
Cons:
- Does not work well with angular or odd-shaped pieces of glass.
- Requires more tools and materials than wrapping or drilling.
- Takes more time to learn and become proficient than other methods.
- Hides some of the glass and may prevent light from shining through.
4. PMC (Precious Metal Clay)
Using precious metal clay is not real well known. However, it is growing in popularity as a medium for fine art, including some sea glass jewelry settings.
Metal clay really is a clay - the difference being that the solid particles in it are your choice of silver or gold. These powder-like metal particles are held together with a binder and water.
The end result after firing with a torch or kiln is a very pure precious metal setting for your sea glass jewelry - for example, between 92% - 99.9% pure silver or 22K gold.
The video below will give you an idea of what to expect.
Compare this method to drilling, wire-wrapping, or bezeling:
Pros:
- PMC allows you to make intricate settings for jewelry.
Cons:
- Tends to hide the sea glass.
- Requires more tools and materials than wrapping or drilling.
- Takes more time to learn and become proficient than other methods.
- Precious metal clay shrinks after being fired and it is hard to judge the resulting size - setting may not fit the class the way you intended.

Other methods?
Polymer Clay
We received a question from Lea, one of our viewers, about other types of clay for making jewelry that don't require a kiln or torch.
Although Lin worked years ago with polymer clay, she has no experience using it for sea glass jewelry. To get up-to-date information on polymer clays, we asked Karen of Crafts for All Seasons.
Lea's question:
"Is there a clay you can use with making jewelry pieces that you don't need a torch or a kiln for?"
Karen's response:
Hello Lea, yes there is!
Pros: Polymer
clay is a versatile clay that can be cured in the oven, usually baked
at 270 degrees F for about 30 minutes, depending on the brand of clay.
The clay is sold in 2 oz. blocks at most craft stores. It is sold in a variety of colors, including some that are metallic.
These
clays can be mixed together and the possibilities are endless. It is a
very popular option for creating beautiful beads for jewelry making.
Cons: Polymer clay can break or crack if you are rough with it - but I haven't experienced many problems with this. You would really have to hit a piece hard for this to happen.
It doesn't always bond well to other pieces - whether they are other polymer clay pieces, metal, wood, plastic, or in your case, a piece of sea glass. Of course this depends on the shape of the clay and how much it is wrapping around the sea glass.
For instance, if you try to bake a small circle of polymer clay that was "pushed" on the surface of a piece of seaglass, and bake the entire piece, it will not be a strong bond. Most likely with a little pressure that circle of polymer clay will push right off the stone. It is best to push the circle against the seaglass to make the proper shape, bake the clay circle on its own, then once it is cooled glue it to the sea glass. I like using
E6000
glue or
super glue
.
For more information on working with polymer clay, please see this article on my website: Working with Polymer Clay
~ Karen from CraftsForAllSeasons.com
Our thanks go to Lea for the good question and to Karen for her kind help.


Comments!
We love receiving your comments, but please read the notes below before posting. Thank you!NOTES:
All comments are moderated. If you leave the page you won't see your comment until it is approved.
Select the "Post to Facebook" check box to be notified on FB when a reply has been posted.
If you scan the previous comments you may find an answer to your question. Click the "View X more" link at the bottom (if visible) to see all comments.
Photos - If you would like to include a photo, please use our Photo Forums.
Questions - If you have a question, it may already be answered. Please tap or click here to search of our site first.